Sending Emails from Olympus
Olympus supports a sophisticated email sending system geared towards sending large email batches. It does so by processing a lot of data on EPS servers and then passing on the actual emails to SendGrid (an email sending cloud-service, owned by Twilio).
There are a number of different ways to trigger sending emails in Olympus, such as using the “Email Batches” feature from the menu, triggering emails from within the issue edit form, or triggering emails from within the event edit form. The specific interfaces presented are slightly different (to support each scenario's exact needs), but all these scenarios really use exactly the same infrastructure (configured in slightly different ways).
Email Batches
Email operations within Olympus trigger the creation of batches. This happens in slightly different ways depending on the target audience, but it follows a general pattern:
- Retrieve a list for the appropriate “target audience”, by querying the appropriate people from our database, such as getting a list of active subscribers or a list of email newsletter subscribers.
- Ensure that the email addresses used by those people are considered “valid”. (Typically, email addresses get flagged as invalid if SendGrid reports them to us as invalid adter we attempt to send a batch).
- The system then checks whether the recipient should be excluded from the batch for some reason (such as already having received a new-issue notification or because they had already received an email of the same batch earlier).
- The system checks whether the recipient is on our internal “do not send” list, which would eliminate them from the batch.
Once this process completes, the system has a list of all the people that are included in this batch. (Note that this process can take a while… sometimes it is minutes, sometimes it is hours) Once the generation of the batch is complete, the system starts processing all those one-by-one by passing the actual email on to SendGrid for processing/sending.
All email generation interfaces feature the ability to estimate the number of recipients. This happens slightly different depending on the scenario. All the estimation algorithm have in common that they do not go through the complete process described above, due to the time it would take to go through all the steps. The estimation feature aims to procide a quick estimate. However, since the full process usually eliminates some of the recipients from the list, the actual number is almost always slightly lower than the estimated number.
Olympus features an “Email Batches” interface that shows the list of recent outbound email batches and information about how those batches have been processed, or - for batches that are still in progress - a percentage of completion. Note that email batches can be triggered from a number of places, and usually, those interfaces have individual lists of batches. However, the “Email Batches” interface always shows ALL batches, regardless of where they were originally generated from.

This interface shows a number of interesting columns:
- Subject: The subject of the email as recipients of the email woudl see it.
- Date Created: Date and time the email batch was initially created. Note that it usually takes hours to generate and process a complete batch, therefore, emails may be received quite a bit later.
- Total Emails: Total number of emails included in this batch.
- Processed: Total number of emails already processed. Once the batch has been completely processed, this number shoudl be the same as the total. (A potential exception is when system administrators manually forced re-processing of some of the emails.)
- Processed %: Total percentage of a batch processed. (Note: This remains at 0% until the complete batch is queued - see above - and the first email is passed on to SendGrid for sending. It is entirely possible that it remains at 0% for quite some time.)
- Last Updated: The date and time the last modification occured in this batch. This usually indicates when the last email in the batch was sent. This is especially useful to see if a batch has “stalled”. (Sometimes the service becomes overburdened with email batches and a batch may stall.)
- Sent: Number of emails that were actually sent. In ideal scenarios, all the processed emails end up being sent. Usually however, some are blocked (see below).
- Blocked: Number of emails processed that couldn't be sent because the recipient was on our internal blocked list. (Note: This does NOT mean that they necessarily received the email. Emails could end up blocked, or undeliverable for some other reason, after it is passed on to SendGrid).
- Category: Categorization for later reporting (usually done through SendGrid directly).
- Batch/Campaign: Multiple email batches can be grouped by campaigns or “batch names”. This allows splitting batches into multiple smaller batches, yet still avoiding sending to the same people, since the system makes sure we are not sending duplicates to the same person for the same batch/campaign.
- Queued by: Name of the user that queued the email batch. (Note: This may not be available for older batches.)
- Description: An internal textual description of the batch, usually generated automatically by the system.
Note that email batches are also grouped by month. This makes it easy to see what emails where sent in what month. There also is a sum of all emails that were passed on to the email processor (SendGrid) for processing. It thus provides a good idea about how close we are to going over our SendGrid limit.
Note that this is not the total number of emails we are processing through SendGrid. It is just the number of emails processed through the email batches system (as described in this topic). However, the system also sends other emails (such as password reminders, subscription confirmations, event signup confirmations,...) that count towards our SendGrid limit. However, the email batches make up the vast majority of emails we send, and therefore, this number provides a good yard stick.
Stalled Batches
Sometimes, large email batches can “stall”. This is likely due to an overburdening of the server infrastructure, and Azure terminating processing. Such batches can be resumed by clicking the Resume Interrupted Batches button in the email pane. When the user clicks this button, the server checks for stalled batches (these are batches that have not shown any activity for 10 minutes or more) and resumes them. Note that this can take a moment. Click Refresh a few seconds after clickig this button, in case no immediate change is apparent.
Copying the Email Body
Using the Copy Email Body button, it is possible to copy the email body text of the selected email batch. This is the raw version of the email, including the placeholders for blocks and fields. The text is copied to the clipboard and can then be pasted into new emails.
Email Newsletters
Email newsletters are the most generic kind of email the system can send. New email newsletter batches are triggered from the Email Batches interface (see above).

To send an email batch, one must first pick the target audience, which can be a combination of any of the following:
- Training Seminar Opt-Ins: These are people who have the flag for seminar news set on their account.
- Online Event Opt-Ins: These are people who have the flag for event news set on their account.
- Email Newsletter Opt-Ins: These are people who have either opted in for newsletters on their account or on a subscription they might have.
- Active Magazine Subscribers: People who have an active CODE Magazine subscription (either print or digital).
Note that our system currently has a somewhat odd combination of where opt-ins might be stored. We are considering a consolidation/simplification of that.
Picking these different options (or any combination thereof) results in a list of email recipients. The system knows how to combine the different options and avoid duplication of recipients. The Estimate Target Audience button in the toolbar allows estimating how many people that will be.
Note that the estimate almost always results in a larger number than will actually be sent. The estimate provides a quick estimate, but can't run a complete duplication check. It also can't include complete block-list checks. Also the system does NOT look at how many people were already in the same batch/campaign (see below). And it completely ignores the “max count” checkbox. Doing a complete count simply takes way too long due to the complexity involved. The estimate is meant to be an estimate that can be provided in a few seconds (or less than a minute at least), which can be somewhat slow even then. An accurate count would take minutes or sometimes hours.
The system also allows limiting the maximum number of recipients. This is useful if you want to send an email to a limited group (perhaps to test a campaign, or some similar reason). It is also useful if you want to split badges into multiple individual email batches (see below for batches/campaigns).
Then, there are some common email fields:
- Sender Email: The sender email as it will be seen by the recipient. Note that it has to come from the
codemag.comdomain in order to be processed by SendGrid. Therefore, addresses likenoreply@codemag.comorinfo@codemag.comare OK.info@eps-office.comis not. - Sender Name: A friendly, text-based sender name, that will be seen by the recipient of the email. Typically, this is something like “CODE Magazine”.
- Subject: The subject as it will be seen by the recipient of the email.
- Batch/Campaign (optional): This field allows to break batches into separate mailings, yet still avoid sending duplicate emails to the same person. For instance, it is possible to send an email newsletter under a campaign name of your choosing (such as “xyz”) and limit the total number of recipients to 5,000. Then, at a later point, send another batch of 10,000 emails under the “xyz” campaign name, and the system will make sure that it excludes the previous 5,000 recipients and find a different set of 10,000 recipients.
Finally, there is the actual email text, which is entered in markdown. (Note that this form remembers your most recent email text and opens up with the last text sent as the default text).
Email text can contain all kinds of markdown or HTML. However, it is recommended that you stick to relatively simple markdown, since it is very difficult to hand-craft a complex email that looks good on the wide variety of email clients and form factors (widnows, web, mobile, watches,...). Recommended markdown options can be seen in the toolbar (used by highlighting some text and hitting the toolbar button), and include:
- Bold:
**enclosed text segments. - Italic:
*enclosed text segments. - Heading 1 through Heading 3: Lines start with
#,##, and###respectively. - List: A list of items where each line starts with
*. - Numbered List: A list of items where every line starts with a number followed by a period, such as
1.,2.,3.,… - Link: A markdown link. (Alternatively, one can also use
<a href="...">tags) - Code: A snippet of source code embedded in HTML
In addition, it is possible to embedd special fields in the text. These fields can be accessed through the Insert Field and Blocks toolbar button:
- CODE Magaazine Logo Header: Inserts a CODE Magazine logo properly formatted to our standards.
- CODE Standard Styles: Inserts a block of styles that we use as a standard for CODE Magazine emails.
- Recipient First Name: This inserts a
##FIRST_NAME##field/placeholder, which gets replaced with the recipient's real first name. (In the preview and in test emails, the system uses a name such as “John”). - Unsubscribe All Emails URL: This inserts a
##UNSUBSCRIBE_EMAIL_URL##placeholder, which is a URL for each user to perform a single-click unsubscribe operation. This can be used in a variety of ways. Typically however, it should be used in a link like this:<a href="##UNSUBSCRIBE_EMAIL_URL##">Click here</a> to unsubscribe from all emails.
A different type of “field” is a “marketing block”. These are standard text elements that can be set up globally and then be placed into emails. For more detail on marketing blocks, see below.
Note that when an email is just about ready to be sent, you can hit the Send Test Email button to send yourself a test email and see what it will look like in your email client. The system then asks for a recipient email for the test. (It remembers that setting on your computer, so it doesn't have to be re-entered every time).
Note that the preview of the email is somehwat imperfect. It is also recommended that you use the light theme in Olympus to preview emails, as that shows colors that are more likely to be close to what people will see in their clients. However, there are so many different email clients, with vastly different capabilities and formats. Therefore, one should always use the test-feature to see what the email will really look like.
New Issue Notification Emails
These are the emails sent to subscribers when a new issue of the magazine is available. New issue notifications are sent through the Issue Edit interface:
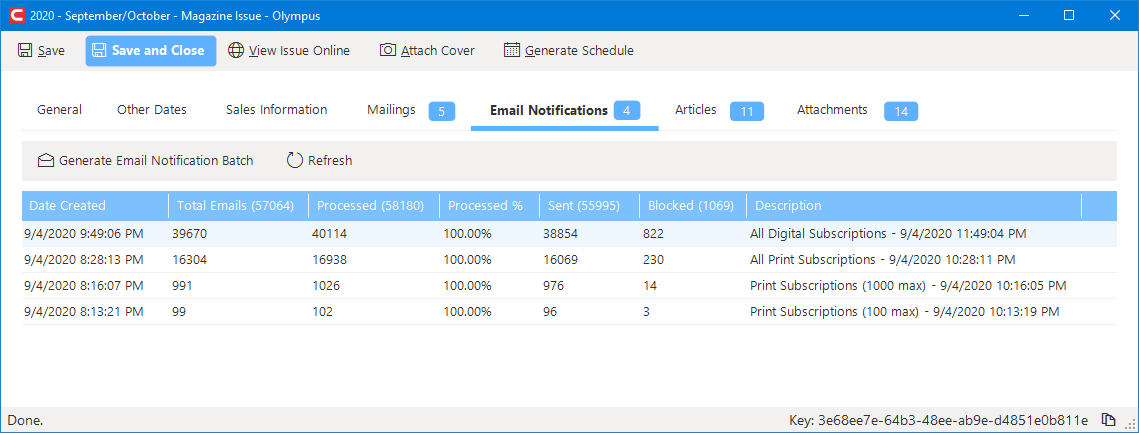
This interface shows the outgoing batches for the current issues. (These batches also show up in the Email Batches interface - see above. However, this is a list filtered for the current issue only. The interface also shows totals in the column headers.)
The interface for creating new issue emails is generally similar to the one for email newsletters (see above):

The main difference is that this is geared specifically towards announcing a new issue. The differences are:
- The UI shows the issue's cover to make it easy to see what issue this email is for, and whether the cover image is available.
- The target audience is largely pre-selected. However, the user still needs to pick whether the notification is to be sent to print subscribers, digital subscribers, or both.
- The feature to estimate the target audience always counts the complete number of subscribers with a valid email address for either print, digital, or both. The estimate completely ignores how many subscribers already received a notification for this issue, so that number has to be subtracted manually. (This is an issue of performance, as an accurate prediction would take way too long).
- There is no batch/campaign option, because the system automatically knows to not send duplicates to the same subscribers, no matter how many time this process is triggered for a specific issue.
- There are different field/blocks that can be inserted into the text:
- Current Issue Title: Title of the issue by means of the
##ISSUE_TITLE##placeholder. (Fully supported in the preview). - Current Issue Cover Image URL: URL to a small version of the cover image through the
##ISSUE_COVER_URL##placeholder. This is typically used inside of an image tag, like this:<img border="0" style="float: right; margin-left: 20px; margin-bottom: 20px; margin-top: 0;" src="/___FileProxy___?mode=vstsgit&path=Olympus/##ISSUE_COVER_URL##" width="190" />. (Note: thesrctag should only contain the##ISSUE_COVER_URL##placeholder, but this documentation shows it incorrectly). This is fully supported in the preview. - Current Issue Abstract: Abstract of the current issue by way of a
##ISSUE_ABSTRACT##placeholder. (Fully supported in the preview). - Current Issue Accent Color: The hex-code for the accent color of the current issue (
##ISSUE_ACCENT_COLOR##). This is usually used in styles or as the background color for sections of the email.
- Current Issue Title: Title of the issue by means of the
Event Promotion Emails
Event promotion emails are largely similar to email newsletters (see above). They are triggered from the event edit form:

The main difference is in the additional placeholders that can be embedded in the email (all of which are supported in the preview):
- Event Name: Name/title of the event (
##EVENT_NAME##). - Event Code: Unique code of the event (
##EVENT_CODE##). Usually used in URLs. - Event Date: Start date of the event (
##EVENT_DATE##), formatted as a short date string. - Event Description: Long description of the event (
##EVENT_DESCRIPTION##). Not that the description of the event is itself a fragment of markdown with rich formatting. - Event City: City the event takes place in (
##EVENT_CITY##) - Event Detail URL: URL the user can use to see detailed/more info about the event (usually used in
<a>tags). - Event Signup URL: URL the user can use to sign upfor the event (usually used in
<a>tags). - Event Webinar URL: If a webinar URL is defined (typically on You Tube), then this URL can be used. (
##EVENT_WEBINAR_URL)
Event Attendee Emails
A special type of event emails are emails sent to people who are already signed up for an event. This is typically done to inform attendees of online URLs, or to send them follow-up information, such as downloads.
These emails are similar to event promitional emails:

However, they are triggered from the list of signups. In addition to the standard event fields supported (see above), this type of email batch supports these additional fields:
- Event Slides (PowerPoint) Download URL: Provides a download link for slides (in PPTX format) attached to an event. (Attched slides have to be uploaded as file attachments, and they have to have a category of
Slidesand a sub-category ofPowerPoint). The field name is##EVENT_DOWNLOAD_SLIDES_PPT_URL##. - Event Slides (PDF) Download URL: Provides a download link for slides (in PDF format) attached to an event. (Attched slides have to be uploaded as file attachments, and they have to have a category of
Slidesand a sub-category ofPowerPoint). The field name is##EVENT_DOWNLOAD_SLIDES_PDF_URL##.
Marketing Blocks
Marketing blocks are text elements that can be set up globally and can then be embedded into emails. This is typically used to generically set up marketing messages and then routinely place into outgoing emails. The big advantage is that marketing blocks can be maintained and updated independently of the main email body.

Marketing blocks are simple in nature. They have the following fields:

- A “Name” (ID): The identifier of the message. (Identifiers do not have to be unique, but there should be only one active message for each ID).
- Active: Indicates whether the block is currently active/available.
- Message: Markdown code for the actual block that is to be merged into the email.
Marketing blocks can then be inserted into all emails by means of placeholders. All the email UIs provide a drop-down menu that shows all active marketing blocks to be inserted into an email:

Note the syntax for the block placeholder: ##MARKETINGBLOCK:Standard1##. The Standard1 part of this placeholder is the name/ID of the block.
Note that the block references by the placeholder must exist and be active. Otherwise, the preview will show an error message in red. If an actual email was sent out with a non-existing or inactive block, the error message is inserted in the email but with
style="display: none;". This way, one can look at the source of the email to see what went wrong, but the customer will typically not see the error.