Utilizing Project Actuals
Purpose: the purpose of Project Actuals, is to provide a quick overview of the amount of time that has been invested, along with details as to who has worked on a given project (Project View), which projects a person has worked on (Person View), or which areas have been worked on for a given project (Project Areas View).
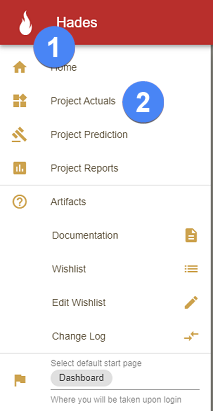
Navigating to Project Actuals
| # | Name | Description |
|---|---|---|
| 1 | Navigation Drawer | Hades logo provides a way to open the navigation drawer, which provides navigation options. |
| 2 | Project Actuals | Upon clicking this button, the user will be sent to the Project Actuals page. |
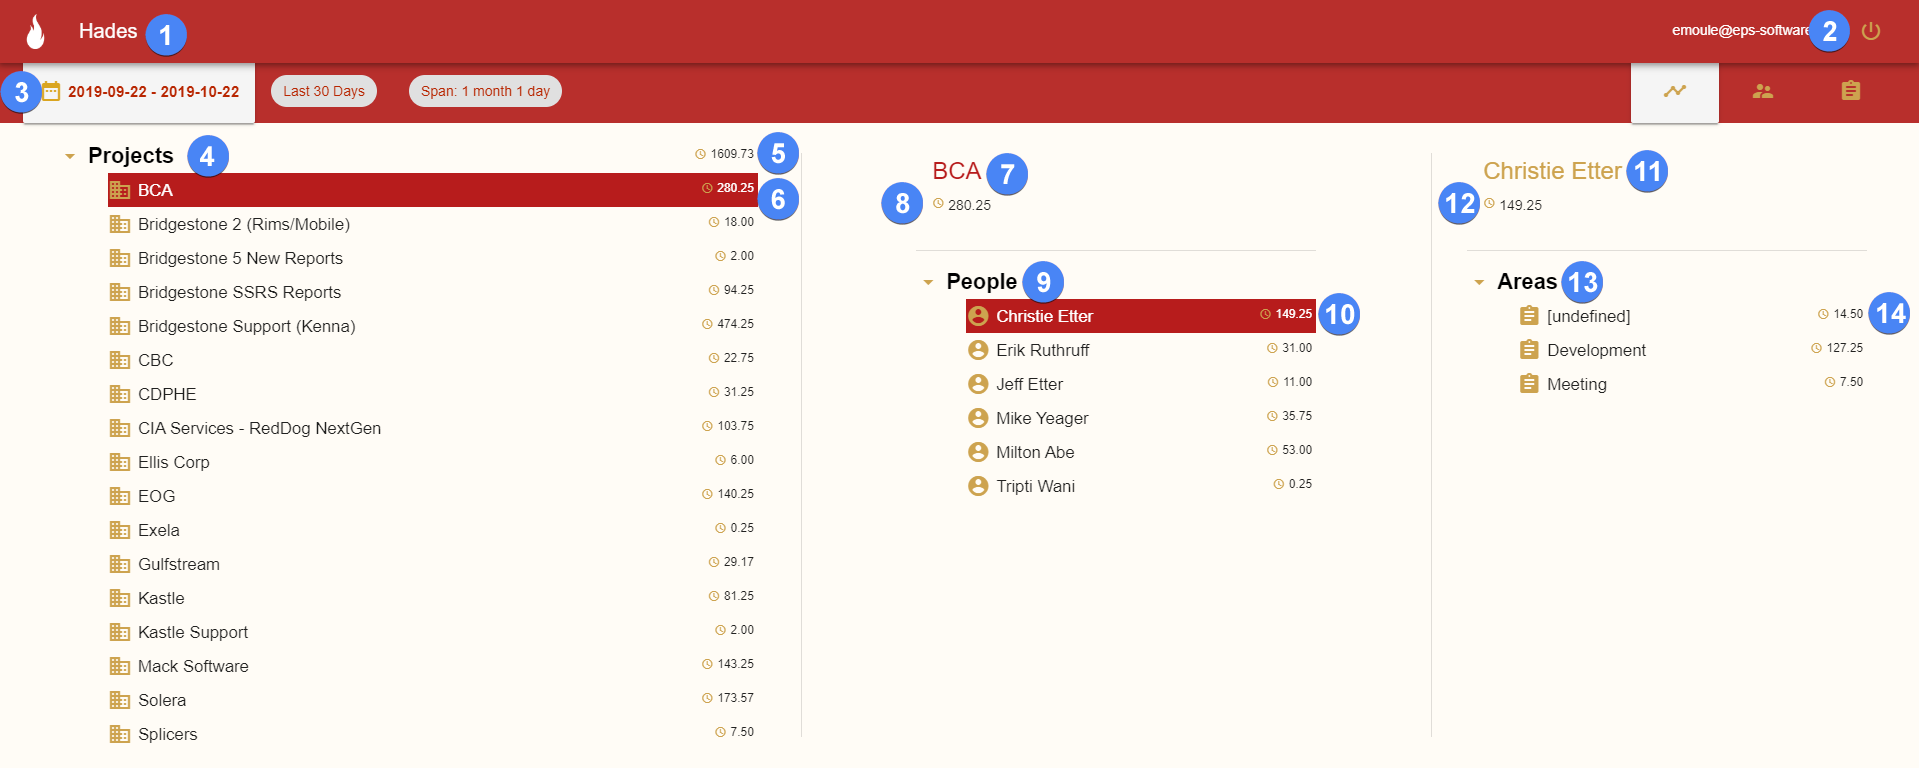
Project View
| # | Name | Description |
|---|---|---|
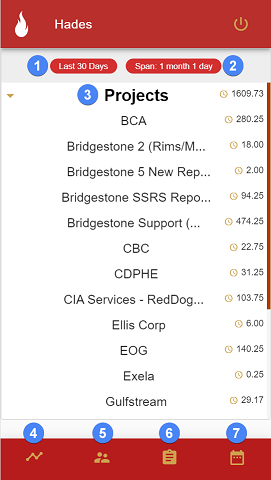
| 1 | Heading | Heading of the page. |
| 2 | Log Out | Upon clicking this button, the user will be logged out, and their session cleared. |
| 3 | Calendar | Upon clicking this, the calendar range box will appear, wherein the user can select the date range for the view. |
| 4 | Projects List | This list is populated by all projects which were worked upon, within the calendar range period. |
| 5 | All Projects Total Hours | This label is representative of all worked hours, cumulative of all projects within the Projects list. The time measurement is in hours, rounded to two decimal places. |
| 6 | Project | This field represents a single project, making up one part of the Projects list. The field provides the project title, along with the cumulative hours that were worked on that project, within the selected calendar range. Highlighted projects represent the currently selected project. Projects can be selected, by clicking a project from within the Projects list. |
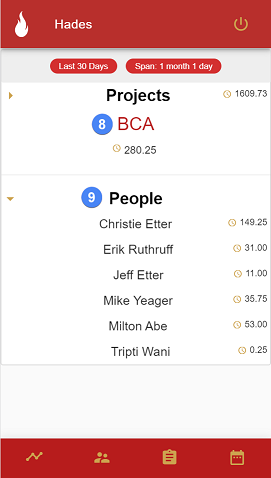
| 7 | Project Title | This label provides which project has currently been selected. |
| 8 | Project Hours | This label provides the cumulative hours that were worked on the selected project, inclusive of all people. |
| 9 | People List | This list is populated by all people who worked upon the selected project, within the calendar range period. |
| 10 | Person | This field represents a single person, making up one part of the Person list. The field provides the person title, along with the cumulative hours that were worked by this person, on the selected project, within the selected calendar range. Highlighted people represent the currently selected person. People can be selected, by clicking a person from within the People list. |
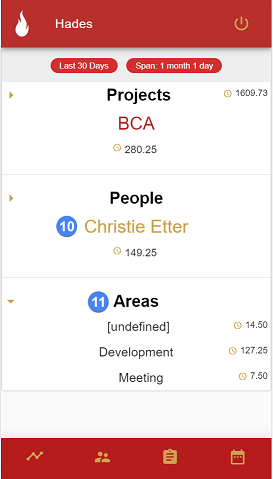
| 11 | Person Name | This label provides the name of the person who has currently been selected. |
| 12 | Person Hours | This label provides the cumulative hours that were worked on the selected project, by the selected person. |
| 13 | Areas List | This list is populated by all areas which were worked upon by the selected person, as part of the selected project, within the calendar range period. |
| 14 | Area | This field represents a single area, making up one part of the Areas list. The field provides the area title, along with the cumulative hours that were worked by this person, on the selected project, within this area, within the selected calendar range. Fields in the third tier panel cannot currently selected. |
| 15 | Project View | This button toggles the view to be Project View. By clicking this, the current calendar range will be taken, and all data between those dates will be fetched. This button will be highlighted when you are looking at Project View. |
| 16 | People View | This button toggles the view to be People View. By clicking this, the current calendar range will be taken, and all data between those dates will be fetched. |
| 17 | Project Area View | This button toggles the view to be Project Area View. By clicking this, the current calendar range will be taken, and all data between those dates will be fetched. |
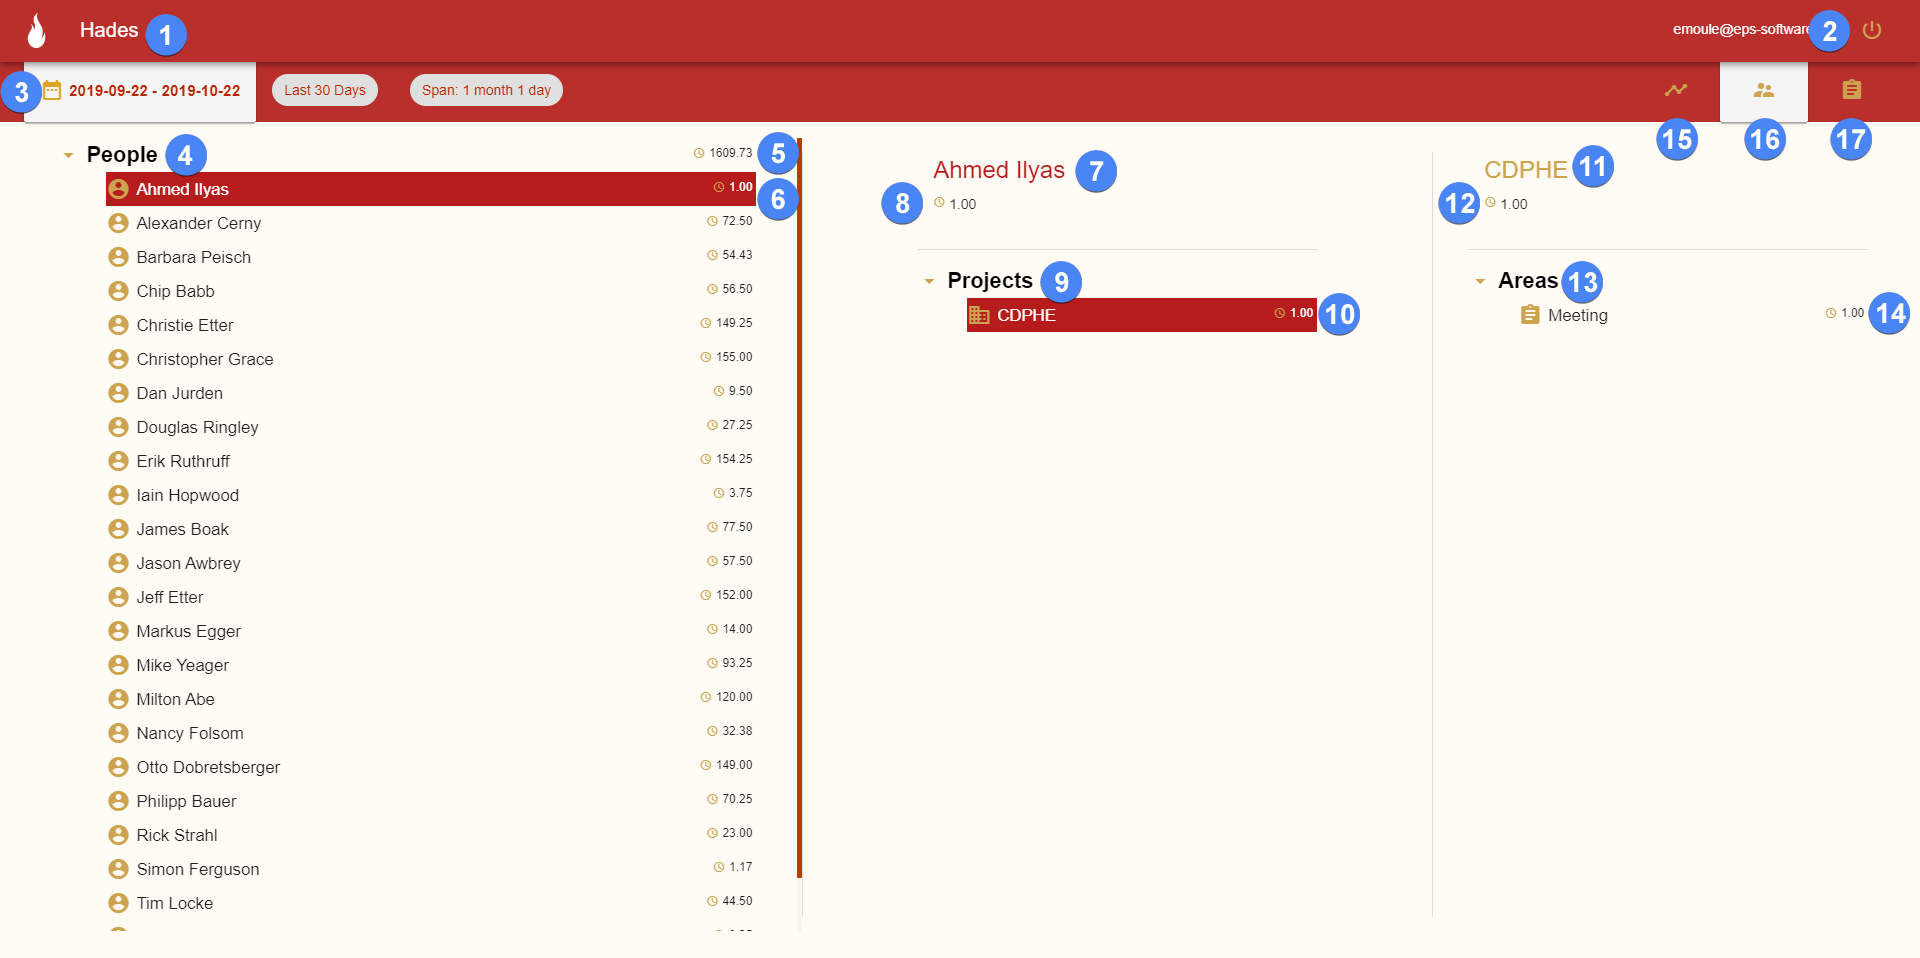
Person View
| # | Name | Description |
|---|---|---|
| 1 | Heading | Heading of the page. |
| 2 | Log Out | Upon clicking this button, the user will be logged out, and their session cleared. |
| 3 | Calendar | Upon clicking this, the calendar range box will appear, wherein the user can select the date range for the view. |
| 4 | People List | This list is populated by all people who have submitted a work ticket, within the calendar range period. |
| 5 | All People Total Hours | This label is representative of all worked hours, cumulative of all people within the People list. The time measurement is in hours, rounded to two decimal places. |
| 6 | Person | This field represents a single person, making up one part of the People list. The field provides the person's name, along with the cumulative hours that were worked by that person, within the selected calendar range. Highlighted people represent the currently selected person. People can be selected, by clicking a person from within the People list. |
| 7 | Person Name | This label provides the name of the person who has currently been selected. |
| 8 | Person Hours | This label provides the cumulative hours that were worked by the selected person, inclusive of all projects. |
| 9 | Projects List | This list is populated by all projects which were worked upon by the selected person, within the calendar range period. |
| 10 | Project | This field represents a single project, making up one part of the Projects list. The field provides the project title, along with the cumulative hours that were worked on this project, by the selected person, within the selected calendar range. Highlighted projects represent the currently selected project. Projects can be selected, by clicking a project from within the Projects list. |
| 11 | Project Title | This label provides the name of the project which has currently been selected. |
| 12 | Project Hours | This label provides the cumulative hours that were worked by the selected person, on the selected project. |
| 13 | Areas List | This list is populated by all areas which were worked upon within the selected project, by the selected person, within the calendar range period. |
| 14 | Area | This field represents a single area, making up one part of the Areas list. The field provides the area title, along with the cumulative hours that were worked by this person, on the selected project, within this area, within the selected calendar range. Fields in the third tier panel cannot currently selected. |
| 15 | Project View | This button toggles the view to be Project View. By clicking this, the current calendar range will be taken, and all data between those dates will be fetched. |
| 16 | People View | This button toggles the view to be People View. By clicking this, the current calendar range will be taken, and all data between those dates will be fetched. This button will be highlighted when you are looking at People View. |
| 17 | Project Area View | This button toggles the view to be Project Area View. By clicking this, the current calendar range will be taken, and all data between those dates will be fetched. |
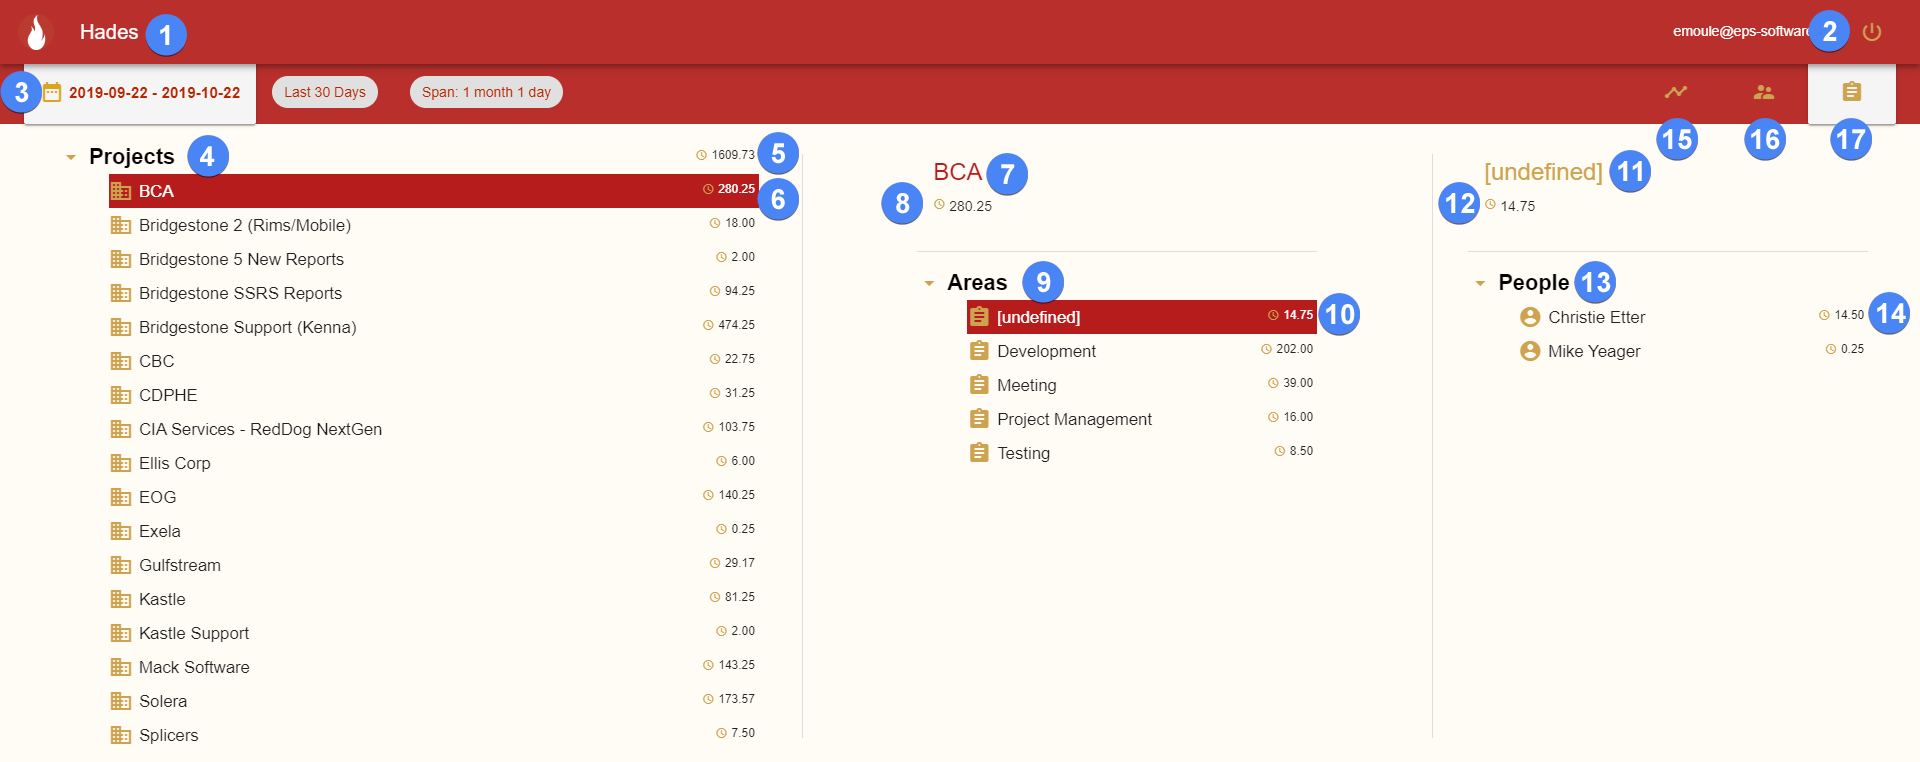
Project Areas View
| # | Name | Description |
|---|---|---|
| 1 | Heading | Heading of the page. |
| 2 | Log Out | Upon clicking this button, the user will be logged out, and their session cleared. |
| 3 | Calendar | Upon clicking this, the calendar range box will appear, wherein the user can select the date range for the view. |
| 4 | Projects List | This list is populated by all projects which were worked upon, within the calendar range period. |
| 5 | All Projects Total Hours | This label is representative of all worked hours, cumulative of all projects within the Projects list. The time measurement is in hours, rounded to two decimal places. |
| 6 | Project | This field represents a single project, making up one part of the Projects list. The field provides the project title, along with the cumulative hours that were worked on that project, within the selected calendar range. Highlighted projects represent the currently selected project. Projects can be selected, by clicking a project from within the Projects list. |
| 7 | Project Title | This label provides which project has currently been selected. |
| 8 | Project Hours | This label provides the cumulative hours that were worked on the selected project, inclusive of all people. |
| 9 | Areas List | This list is populated by all areas which were worked upon, within the selected project, within the calendar range period. |
| 10 | Area | This field represents a single area, making up one part of the Areas list. The field provides the area title, along with the cumulative hours that were worked on this area, on the selected project, within the selected calendar range. Highlighted areas represent the currently selected area. Areas can be selected, by clicking an area from within the Areas list. |
| 11 | Area Title | This label provides the name of the area which has currently been selected. Areas with the title ‘[undefined]’ represent time logged which did not have a project area provided. |
| 12 | Area Hours | This label provides the cumulative hours that were worked on the selected area, within the selected project. |
| 13 | People List | This list is populated by all people who worked upon the selected area, as part of the selected project, within the calendar range period. |
| 14 | Person | This field represents a single person, making up one part of the People list. The field provides the person's name, along with the cumulative hours that were worked by this person, on the selected project, within this area, within the selected calendar range. Fields in the third tier panel cannot currently selected. |
| 15 | Project View | This button toggles the view to be Project View. By clicking this, the current calendar range will be taken, and all data between those dates will be fetched. |
| 16 | People View | This button toggles the view to be People View. By clicking this, the current calendar range will be taken, and all data between those dates will be fetched. |
| 17 | Project Area View | This button toggles the view to be Project Area View. By clicking this, the current calendar range will be taken, and all data between those dates will be fetched. This button will be highlighted when you are looking at Project Area View. |
Calendar Controls
Range Selection
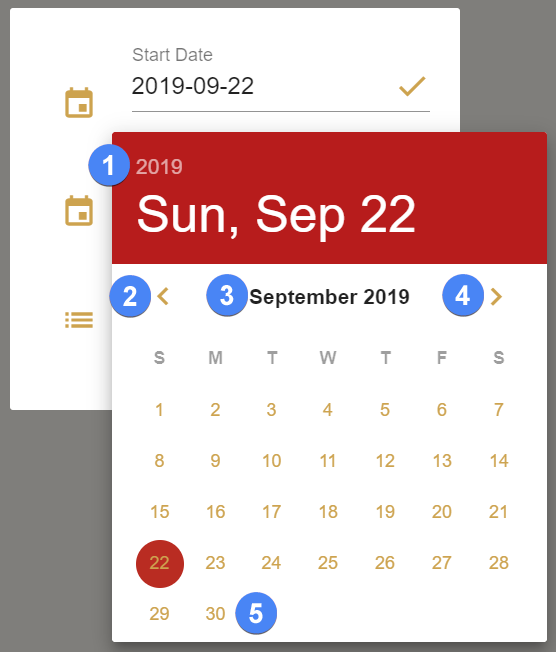
Upon clicking the calendar icon, or date range, the calendar range component will appear. This will darken the area behind the component, and provide several options.

| # | Name | Description |
|---|---|---|
| 1 | Calendar Start Button | Clicking here will open a date picker, allowing the user to select a start date. |
| 2 | Calendar End Button | Clicking here will open a date picker, allowing the user to select an end date. |
| 3 | Start Date | This text field provides the currently selected start date. The user is able to manually edit this field by typing a date in. From there the date checker, to the right of the field, will attempt to parse the typed date: if successful a tick will be shown, otherwise a cross. The accepted date formats include: YYYYMMDD, YYYY-MM-DD, and YYYY/MM/DD. |
| 4 | End Date | This text field provides the currently selected end date. The user is able to manually edit this field by typing a date in. From there the date checker, to the right of the field, will attempt to parse the typed date: if successful a tick will be shown, otherwise a cross. The accepted date formats include: YYYYMMDD, YYYY-MM-DD, and YYYY/MM/DD. |
| 5 | Selected Preset | Clicking the presets field will open up a dropdown menu, provided many preset calendar range options. Selecting one will make navigating to frequently used dates a lot faster. To quickly get to a preset, the user can type into the field, and all matching options will appear. |
| 6 | Input Check - Start Date | When the date to the left of this check (start date) have been successfully parsed, the check will display a tick. If the date input cannot be parsed, it will display a cross instead, clearly providing whether the currently selected dates are accepted. |
| 7 | Input Check - End Date | When the date to the left of this check (end date) have been successfully parsed, the check will display a tick. If the date input cannot be parsed, it will display a cross instead, clearly providing whether the currently selected dates are accepted. |
Calendar Date Picker
Clicking any where outside of the calendar component will close the component.
| # | Name | Description |
|---|---|---|
| 1 | Year | Clicking here will provide a list of years, wherein the user can select a year. |
| 2 | Month Decrement | Upon clicking this button, the month for your chosen year will decrement, to the month prior. |
| 3 | Month Select | Upon clicking this button, a grid of months will appear, wherein the user can select a month. |
| 4 | Month Increment | Upon clicking this button, the month for your chosen year will increment, to the month following. |
| 5 | Date Select | Within the default control, all the days of the provided months will appear. The user simply needs to click/ select the day they desire. Upon selection, the calendar will close, back to the calendar range component. |
Mobile View
So to make the Whiteboard available for any device, styling has been added for smaller monitors, and mobile devices. The view is dynamic and responsive, and will update as the size of the page handle is changed.
The mobile view operates identically to the larger version, just some controls are resized to fit more comfortably.
| # | Name | Description |
|---|---|---|
| 1 | Selected Calendar Preset | This chip provides the currently selected calendar preset. |
| 2 | Time Span | This chip provides the time span between the two selected range dates. This number is inclusive of the last selected day (so may look to be one more day than realized). |
| 3 | Projects List | Mirroring the desktop view, the projects view provides a list of projects, which can be selected. |
| 4 | Projects View | Clicking this button will provide the Projects View, which provides a list of projects, with all people whom worked on that project, and their associated areas. This view works the same as the desktop version, just looks different. |
| 5 | People View | Clicking this button will provide the People View, which provides a list of people, with all projects which that person worked upon, along with their associated areas. This view works the same as the desktop version, just looks different. |
| 6 | Project Areas View | Clicking this button will provide the Project Areas View, which provides a list of projects, with all areas which were worked on that project, and the people who worked within each area. This view works the same as the desktop version, just looks different. |
| 7 | Calendar | Clicking this button will open the mobile calendar, range picker. This calendar works the same way the desktop does, though does not include the ability for the user to type in a date (they must use the date pickers). 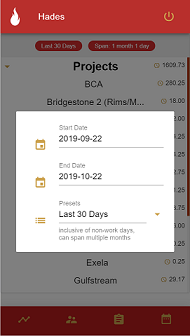 |
| 8 | Selected Project | This label provides the name of the currently selected project. |
| 9 | People List | This list is representative of all the people who worked on the selected project, within the selected calendar range. In Person View, this would be a list of People. In Project Areas View, this would be a list of Areas. |
| 10 | Selected Person | This label provides the currently selected person's name. In Person View, this would be the title of the selected Project. In Project Areas View, this would be the title of the selected Area. |
| 11 | Areas List | This list is representative of all the areas which were worked on by the selected person, within the selected project, within the selected calendar range. In Person View, this would be a list of Areas also. In Project Areas View, this would be a list of People. |