Edit Articles
Finding Articles
To edit an article, it has to be opened for editing, which can be done in a variety of ways in Olympus. For one, there is the “Article Control Center”, which can be used to find articles using a variety of criteria, from finding articles via a full-text search, to listing articles by authors or issue, and others.

Dobule-click the article you would like to edit to open the article edit form (detail form). (See below)
Articles can be searched in a variety of ways:
- Full-Text Search: This uses our Azure cognitive search capabilities to do a smart search across all article contents. This considers all parts of the article, such as the full text, the categories, title, authors, and more. The returned result is ranked and (by default) sorted by relevance. In this case, the relevance score is also displayed. (Note that this can return a large list of articles, some of which may have very low relevance for the search, but those are then at the bottom of the list.)
- By Magazine and Issue: Displays all articles associated with that magazine and magazine issue.
- By Author: Displays all articles for the selected author.
- By Category: Displays all articles filed in that category. (Note that the resulting display also shows all other categories the articles are filed under.)
- Specialty searches: These are all searches that generally return a list of articles that have some sort of problem.
- Articles without Authors: Displays all articles that do not have an assigned author. (There should never be articles that do not have at least one assigned author.)
- Uncategorized Articles: Displays all articles that don't have any categories assigned. (There shoudl never be articles that aren't categorized at all.)
- Articles without Markup: Displays all articles that are not yet defined by Markdown content. These are old articles that have not been brought forward to the new content format and are driven from the imported XML. The display format of these articles is often very rough in digital form, and we should aim to bring as many articles forward to the new format as posslble.
- Unpublished Articles: These are articles that have not been published and are thus not visible to anyone. The system tries to figure this out by looking at articles that are not in a specific issue of a periodical publication (like CODE Magazine or CODE Focus Magazine) and are not part of a sequential publication (like email newsletters that do not have specific issues, but are just published ongoing) and have a release date that is in the past.
Note the feature to
Force-Sync Article and Author Files. This can be used to trigger manual sync of potentially outdated article images and author photos to Azure. This impacts the display of these images on the web site, mobile app, and other places. (Note that there sometimes may be a short delay before those images show up in various places, as some systems employ caching mechanisms for performance reasons. But this detay should only be a few minutes… usually no more than 5 or 10 minutes).
Another option to see a list of articles is through the “Magazine and Issue Control Center”, which allows opening an issue of the magazine, which has a tab for the articles within the issue. Once again, articles can be edited by double-clicking them there:
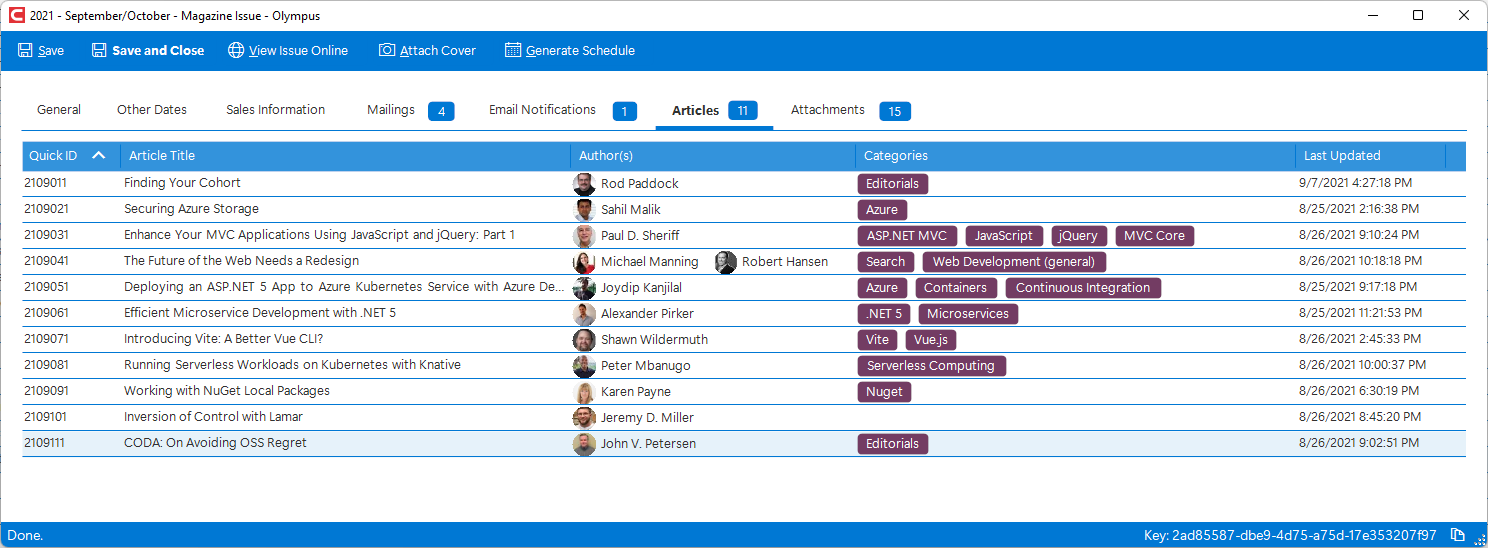
All article lists in Olympus (which can appear on various other screens as well) have a similar list of columns, which include the following:
- Search Relevance: In article lists produced by means of an “intelligent search” (full-text search), this field shows the relevance of the article in relation to the provided search term. The higher the number, the more relevant the article is for the search term.
- Quick ID: Quick ID of the article. Should be unique (although the system does not enforce this, and across different publications, this may not be an issue, depending on where the article is displayed.) This field may also have a background color, indicating the “accent color” defined for the article. A white background color indicates that the article may not have an accent color assigned. (Although in full-text searches, the accent color may just not be available.)
- Article Title: The title of the article.
- Author(s): The author of the article, including a small version of the author image. May list up to 4 authors in scenarios where articles have multiple co-authors.
- Categories: All assigned categories. Categories are usually shown colorerd, although the colors are only there for cosmetic reasons and have no deeper meaning.
- Published in Issue(s): Shows a list of up to 3 magazine issues the article may have been published in. If a cover image is available for the issue, it will be displayed as a thumbnail.
- Last Updated: Time stamp the article was last edited. (Note that this may not be a very significant update. Any save operation will set this timestamp).
The following screen shot shows a list of articles that are mostly lacking defined accent colors, except for articles with quick IDs 2312021 and 2312041.

Editing Article Detail
The article edit form is the one place where just about any information about the article can be edited, including infomration about the article, abstracts, the actual content, and file attachments.
General
The general tab shows general information about the article.

This includes the following fields:
- Quick ID: This is the ID of the article by which the system identifies it for a variety of scenarios (such as displaying the article in the web page or in the mobile apps). The ID needs to be unique, and it needs to follow a very specific pattern: First two digits are the year (20 for 2020). Next two digits are the issue (07 for July for instance). The next 2 digits are the sequential number of the article (01 = editorial, 02 = first article). Last digit is the magazine (1 = CODE, 2 = CODE Focus,..). Note that the system does not as such enforce the uniqueness of this ID. However, it is typically auto-generated in a way that makes it unique.
- Title: The title of the article. This is used for display in the table of contents, the web page, search results,…
- Abstract: This is the short description of the article. It is used in the table of contents, search results,…
- Headline: Could be an alternate title. This field is currently not used anymore.
- Cover: Indicates whether the article is one of the main articles in the issue and thus listed on the cover. Note: This field is currently not used for anything, but we could choose to use it again in the future.
- Accent Color: Accent color to be used for various display tasks, but in particular to render a header and text headings for the article (when displayed on a web site or in the mobile app).
- Locked: Indicates whether the article is locked away behind a pay-wall, or free. Note: We currently do not use pay-walls, so this field goes ignored. However, we could use it again in the future.
- Type: Indicates the type of the article (comment, technical, product review). This changes the format and layout applied to the article on the web page, in print, or in mobile apps.
- Status: Indicates whether the article is published or not. Published articles are included in searches and displayed on the wweb. This flag is only important for articles assigned to magazines that are continuously published (such as our email newsletters). For periodical magazines (CODE Magazine, CODE Focus Magazine), the publish flag is actually ignored, since either the whole issue is released or not.
- Release Date: Indicates when an article is published. Only important in continuously published publications. For periodicals (CODE Magazine, CODE Focus Magazine), the release date is driven by the release date of the entire issue.
- Sample download URL: If this field is set (must be a full URL including
https://xxx) then a download link appears when the article is displayed on the web, and the link used here is used as the URL the link links to. - Issue 1 through 3: The issue of a magazine the article is published in. (Note: this is generally set through the production system and not through Olympus.)
- Author 1 through 4: The authors who have written this article. (Note: this is generally set through the production system and not through Olympus. In fact, this is currently only used for display and has not been reactivated for editing after the Medusa attack.)
The article edit form features the following toolbar buttons:
- Save: Saves the article and keeps the edit form open.
- Save and Close: Saves the article, and if the save operation is successful, closes the form.
- View Article Online: Launches a web browser and shows the article as it appears to readers. (Note: To see the latest version, make sure you click save before viewing the article online).
- CODE Copilot: Launches the Copilot “sidecar” (see below).
- Generate Abstract: Uses Copilot features to generate a short abstract of the article based on the article's markdown content, and places it in the Abstract field.
- Generate Art: Uses AI to analyze the article's markdown and then generate art ideas.
- Pick Categories: Allows assigning article tech categories.
Markdown content
This is the main article content. All our article systems now use the markdown version of an article to display the article (such as on the web or in mobile aps):
Note that the tab indicates whether the markdown is present or not. If markdown has been generated and stored away, there well gbe a Yes indicator next to the tab name. If there was no markdown, the system auto-generates it on the fly from the XML content (see below). In that case, it will say New instead.

The markdown follows standard markdown rules. There are a few things to point out however:
- Code snippets: All code snippets must have a language indicator (such as the JSON code snippet in the image above). If no specific language is desired, flag the code as
cmd(command line file or text). Code snippets must also be checked for formatting. Line breaks and spacing is usually badly off after import, so they need to be fixed manually. - Code listings: Same as snippets (see above). In addition, listings always appear at the bottom of the article after import, but they need to be moved to where they are referenced in the text. For instance,
Listing 1needs to be cut at the bottom, then you need to search for “Listing 1” in the text, and then the listing (with heading) must be pasted typically right below the paragraph that first references that listing (such theCTRL-Fsearch feature to find the reference in the content). Sometimes, the article may flow in a way where a judgement call needs to be made as to where the listing should be placed (such as if there already is a code snippet right after that paragraph, in which case the listing should be placed after the code snippet). - Literal references: We wrap literal references (such as class names, or variable names, or keystrokes, or…) into the markdown “single code quotes” (the single quote on the key below the escape key on your keyboard). The conversion algorithm tries to do a good job at this, but the article needs to be looked through to make sure it all appears right, the system didn't flag incorrect things as literals, and no literals were missed.
Note: It is possible to force the system to re-generate the markdown by clearing out the markdown field and saving and closing the form. This will set the markdown field to empty, thus forcing the form to re-create the markdown the next time you open that article for editing. Needless to say, this kills all manually adjusted markdown that was there before. Therefore, this feature shoudl only be used in special scenarios.
XML Content (legacy)
Like the markdown tab, the XML tab indicates whether XML content has been imported by showing Yes in the tab header:

If the XML has not been imported, it can be manually imported from a Word Document (*.docx file).
Note: If you do not have the Word document, it is likely attached to the article in the attachments. Save it from there and then import it. This generates the XML. Save the form and close it. Then, re-open it to force the auto-generation of the markdown content from the XML. All markdown is generated from the XML rather than directly from the Word document.
The XML content is legacy and only used to generate markdown from it. It is possible to manually edit the XML, but it is a much more complex format than the markdown version, so it is not recommended to edit the XML directly.
Article Images
This tab shows all the images used by the article content. The number of images is shown in the tab header. Article images are automatically imported from the Word document when the XML is generated (see above). All article images can be referenced by name from the XML and markdown content (the system knows how to link them correctly).

Attachments
This tab shows all article file attachments. These are only for interal use and include files such as the actual Word document with the original content the author submitted. It may also include ZIP files with downloadable content. Often, it also has a ZIP file with the article images separated out. (Although we now usually extract the article images directly from the Word document during XML import - see above)

Attachments can be opened right from this UI (by double-clicking an attachment). Right-clicking an attachment reveals further options, such as editing the category or description, saving a local copy of a file (which is particularily useful for Word documents that need to be imported into XML - see above), or adding additional files.
Attachments can usually also be edited from this screen. For instance, double-clicking a Word document will open it in Word, by first downloading and placing the file into the temporary files folder on the local machine, then opening Word, and if the user edits and saves the document, Olympus observes the save operation of the temporary local file, and uploads it back into our attaachment system, thus creating the experience for the user of editing the attachment directly.
Attached files can be just about anything and of any category. However, there are some categories and sub-categories that have special meaning for the system:
- Category:
production- Sub-category:
text- this is the actual Word document the author submitted. In our production system, files with this category/sub-category will be displayed to the layout team as the text that needs to go into the print version. - Sub-category:
images- this is a ZIP file containing copies of the image files used in the article. Again, the production system uses this for the layout team.
- Sub-category:
- Category:
downloads- Sub-Category:
approved- If files with this category/sub-category are present, the web page will display a download link (similar to the external download URL - see above) and allow the reader to download this file directly, to obtain code samples associated with the article.
- Sub-Category:
- Category:
header- Various header fieles with sub-categories are used to render art related to the article (see Artwork for more information on details). - Category:
artwork- This category is usually used to attach and store artwork for internal use. (These files are usually not visible to the outside world).