CODE Framework Service Exercise
Mike Yeager January 2, 2020
1 – New Database
Since most (but not all) services work with a database, we’ll create one to use for this exercise. If you don’t have a database installed or want to skip this part, you can fake the database calls during the exercise.
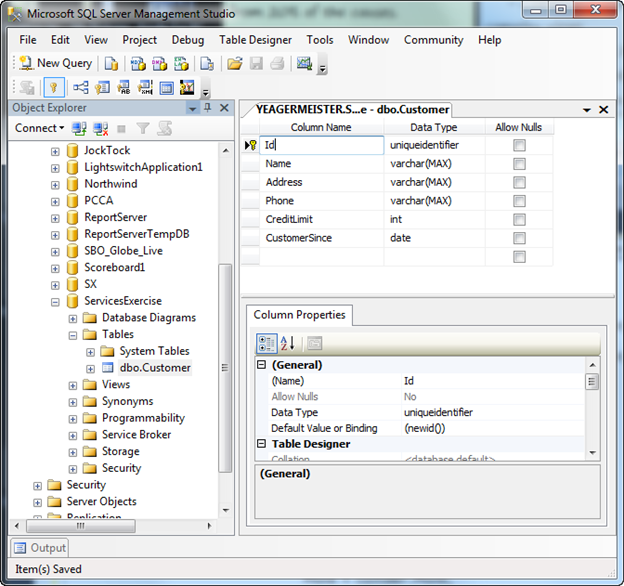
Using SQL Management Studio (or the appropriate tool for a different db), create a new database on your local machine. Name the database “ServicesExercise” and create a table named “Customer”. This exercise is not about database design, so I won’t go into details, but we’ll follow EPS standards. Name tables with singular names. Name the primary key “Id”, uncheck Allow Nulls and set the Default Value to newid(). Add the rest of the columns as shown above. None of the columns will allow null, the string columns will default to an empty string (‘’), the int column will default to 0 and the date column will default to getdate(). Save the table, then after saving click on the Id column again and click the toolbar icon that looks like a key to set this column as the primary key. Next, click on the icon that looks like a key on top of a form. In the properties for the primary key, set Create As Clustered to No.

Save the database.
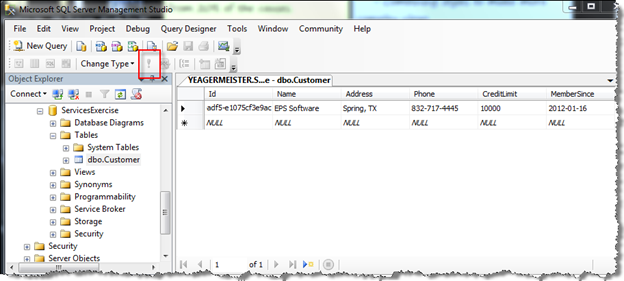
Right-click on the Customer table in SQL Management Studio and select Edit Top 200 Rows. Enter data for everything except the Id and MemberSince columns and then move to the next row. Click on the red exclamation point to enter the data and display the new Id and MemberSince assigned by SQL Server:
We’re done with SQL Server Management Studio for now.
2 – Decide on the Methods We Need
Best practice seems to be to develop the UI first, in order to flesh out what is needed from a service; however there is no technical limitation to developing services first. This exercise builds on the WPF exercise however; you can still complete this exercise, even if you haven’t done the WPF exercise first. The WPF exercise allows a user to retrieve a list of customers,add and edit customers, so we’ll need a total of 3 calls. Most (if not all) of the service calls will be found in the ViewModels of a UI project. For the WPF exercise, we added TODO: comments to make them easier to locate. Looking at the code below for showing a list of customers, we’ll need a call to retrieve three pieces of information for each customer.

We need a call something like this:
service.GetCustomers(no params)
returns: Id, Name, Address, Phone
Next, we’ll need a call to retrieve ALL of the data for a single customer in order to do add and edit:

A call something like:
service.GetCustomer(Guid id)
returns: Id, Name, Address, Phone, CreditLimit, CustomerSince
And finally, we’ll need a call to save new or edited customers. A call something like:
service.SaveCustomer(Id, Name, Address, Phone, CreditLimit, CustomerSince)
returns: Success
3 – New Contract Project
In Visual Studio create a new project. If you’ve completed the WPF exercise, you can add this project to that solution. If not,go ahead and create a new solution.
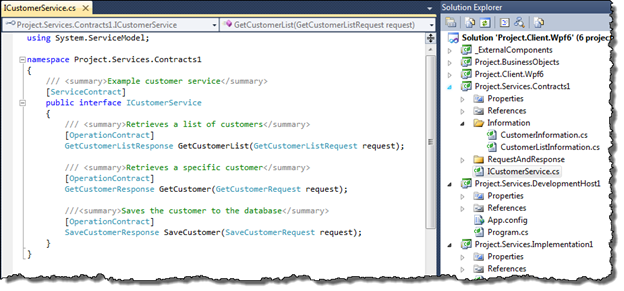
Creates an interface named ICustomerService in a file named ICustomerService.cs. Create method calls named GetCustomers and GetCustomer. Each method signature has correspondingly named Request and Response Data Contracts. Always 1 of each, always named the same as the method call. Create the contracts even if there are not properties in them and never re-use a contract. Service Contracts should be commented where the intent is not obvious as this will become the documentation for all developers who use the service.
ICustomerService.cs references 2 request and 2 response contracts and 2 information contracts. For the purpose of organization,we’ll put these contracts into separate .cs files using the best practice of putting each matched request and response contract into a separate file and each “information” contract into a separate file. Right-click on the contract project and add a new class file. Name the file GetCustomerListRnR.cs. Create a second class file named GetCustomerRnR. Create a third named CustomerInformation.cs and a fourth named CustomerListInformation.cs Cut and paste the entire contents of the ICustomerService.cs file into each of the 4 new files.
Now review the Request and Response objects the template provided for us to make sure they’re appropriate.

Notice that we remove RequestAndResponse from the namespace and that we always remove unused “using” statements at the top and sort them.
Do the same for the Information data contracts in the Information folder. Add Address and Phone properties to the CustomerListInformation contract and make sure the Name property is not spelled FullName.

Note: In this example, we’re using the word “List” in the CODE Framework templates, this type of contract is often referred to a “Quick” information.
Change the CreditLimit property from decimal to int. Remove the LastName property and rename the FirstName property to Name.

4 – Add the Final Service Call – SaveCustomer()
Add the final method signature named SaveCustomer to the ServiceContract in ICustomerService.cs. You can type it all out, but it’s faster to use cut and paste or better yet, create the Service Operation “so” Visual Studio shortcut for Code Framework.
Now create the Request and Response Data Contracts for the call in the “RequestAndResponse” folder:

Pass one parameter to the method; a data contract representing a customer. Return only the default properties in this case: That completes the contracts for the Customer Service. Make sure the solution compiles.
5 – Implement the Service
Now we have everything we need to implement the service in the UI project(s). Will tackle that task later in the exercise, but it’s important to know that this is the case! Now that the contract is defined, we need to implement the service in its own class library project:

For now, just create the skeleton code for the calls. Make sure the solution compiles.
6 – OPTIONAL - Create a Development Host to Test the Services
It is unlikely that you will need to host any protocols except TCP for development purposes for use with .NET client apps. Notice that references to both the contracts project and the implementation project have been added. Open Program.cs and review the code.
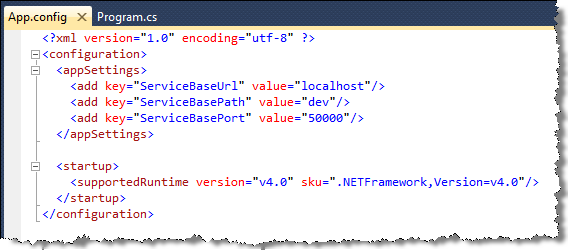
Open the app.config file and notice that by default, the service will be hosted on port 50000. You can uncomment the settings and modify them if you need to use settings other than the defaults.
Set the DevelopmentHost project to be the startup project for the solution and run it <F5>:

You should be able to double-click on the service and get list of calls to test:

Test the GetCustomerList call. It should return Success = true, but no data.
That’s it for the development service host.
7 – Create Business Objects
If you’re skipping over implementing an actual database then continue to the next section. If you’re implementing the database with SQL Server, then continue here.
For this example, we’ll use Entity Framework 6 for our business objects. This will obviously be different if you use Milos or NHibernate or another framework.
Add a new class library project to the solution and name it Project.ORM:

Delete the Class1.cs file from the new project and add an ADO.NET Entity Data Model to the project and name it “ProjectModel”.

Choose Generate from database and create a new connection to the ServicesExercise database on your local SQL Server. Click Next and select all tables (there is only 1), then click Finish.
The Business Objects project is now complete. Close everything and make sure the project compiles.
8 – Implement the Service Calls Using Business Objects
If you’re skipping over implementing an actual database then continue to the next section. If you’re implementing the database with SQL Server, then continue here.
Open up the App.config file in the project.ORM project. Copy the connectionStrings section and paste it into the App.config file in the DevelopmentHost project. Since the DevelopmentHost application is the one that will be hosting the service and the Entity Framework, this is where EF will look for its configuration settings.

Open up the Project.Services.Implementaiton project and add a reference to the Project.ORM project (If necessary, also add a reference to System.Data.Entity and a using statement for System.Linq).
Open up CustomerService.cs and add a using statement for Project.ORM. Replace the TODO comment with a LINQ query that returns all of the customers sorted by customer name:

Note that this code is not quite as concise as it could be, but it is much easier to debug this way. Also note that if no data is returned, we do not write null into the contract, we leave it initialized to an empty list.
Run the solution again and test the GetCustomerList call. You should see the test record we entered into SQL Server earlier.
Next, implement the GetCustomer call:

Finally, implement and test the code for SaveCustomer:

9 – Implement the Service Calls in the WPF UI
Open up the WPF project and add a reference to Project.Services.Contracts. Then, in the Models folder, open CustomerListViewModel.cs. Replace the TODO comment and fake data in the LoadData method with a call to the service:

Add an App.config file to the WPF project and add configuration for the Development Service Host:

Set the Solution to have multiple startup projects (right-click on solution) and set both the WPF project and the Development Service Host project to start. Press <F5> to run. Both apps should run and you should get back the one record we have in the database when you click on the Customers tile.
Open CustomerEditViewModel.cs and replace the TODO comment and fake data in the LoadData method with a real service call:

Run the app and make sure the edit screen pulls up your customer data when selected.
Change the “Example” button in the edit screen to say “Save”, create a method named Save and call the method from the ViewAction. You can use a lambda to eliminate the unused parameters or accept the parameters in the Save method:

Add a service call to the save method to do the actual saving. If the call is successful, close the view. If it isn’t successful, show the error message:

Run the app and test saving changes.
Add the ability to create new customers (if you haven’t already done this in the previous exercise). Open CustomerListViewModel.cs and add a new action to the Actions collection:

Open CustomerController.cs and create an Add method:

Since you will be re-using the Edit.xaml view and not creating a new view with the default name Add.xaml (to match the method name), specify the view you want to use explicitly as the first parameter.
Notice that there is currently no constructor for CustomerEditViewModel that takes no parameters. Open CustomerEditViewModel.cs and add one now by copying the existing constructor and removing the id parameter:

Now make an overload of the LoadData method that takes no parameters and, instead of calling a service to retrieve existing customer information, initializes the ViewModel as a new customer:

Run the application to test adding new customers. Notice that you will have to close the list view and re-open it to see new customers. Fixing that is covered in another exercise.
Summary
With the skills used in this exercise, you can develop the business logic for large, scalable, powerful applications. Practice this exercise until you can do it from memory. In future exercises we’ll cover more topics such as deployment options and providing services for non-.NET clients.